Build a Face Recognition App with AI Edge Computing
21 May 2024
0 Comments
Perform Actions Based on Face Recognition Using HuskyLens
This facial recognition tracking demo uses DFRobot's HuskyLens for facial recognition and performs corresponding actions based on the recognition results. For example, when HuskyLens recognizes a specific face, it can trigger the device to wave a flag, play music, turn on lights, or execute other preset actions. This intelligent facial recognition technology can bring a more convenient and personalized user experience.

Devices Used In this Project
-
Raspberry Pi 4B
-
Two SG90 180-degree servos
-
SKU SEN0305 Gravity HUSKYLENS AI Camera
-
Breadboard
-
Male-to-male jumper wires
HuskyLens AI Vision Sensor
HuskyLens AI Vision Sensor is an easy-to-use AI vision sensor that comes with seven built-in functions: face recognition, object tracking, object recognition, line following, color recognition, tag recognition, and object classification. With just one button, you can complete AI training, eliminating the need for complex training and intricate vision algorithms, allowing you to focus more on the design and implementation of your projects.
HuskyLens has onboard UART/I2C interfaces, which can connect to mainstream controllers like Arduino, LattePanda, and micro:bit, allowing seamless hardware integration. HuskyLens directly outputs recognition results to the controller, enabling you to create highly creative projects without having to deal with complex algorithms.
Specific Steps
This project can recognize both single and multiple faces, enabling more precise facial recognition and crowd monitoring.
1. Recognizing a Single Face
This function can detect any facial contours, recognize and track learned faces, and send the data through the serial port. By default, it is set to learn and recognize a single face.
Operation Settings
Toggle the "function button" to the left until "Face Recognition" appears at the top of the screen.

Learning and Recognizing a Single Face
(1)Detect faces.(2)Point the HuskyLens at an area with faces. The screen will automatically highlight all detected faces with white boxes and display the word "face" for each.
(3)If the "+" in the center of the screen is not aligned with any face frame, the RGB light on the other side will not light up.

(4)If the "+" in the center of the screen is aligned with any face frame, the RGB light on the other side will turn blue.

Tip: If you want HuskyLens to learn or recognize your own face, such as for a selfie, and you cannot see the screen, you can determine the status based on the different colors of the RGB indicator light.
Learn Faces
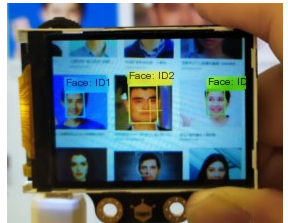
(1) Align the "+" in the center of the HuskyLens screen with the face you want to learn, and briefly press the "learn button" to complete the learning process. If the same face is recognized, a blue box will appear on the screen displaying "Face: ID1." This indicates that face recognition is now possible.

(3) The method for entering faces from various angles is as follows: (Note: Before learning a new face, you must first make HuskyLens forget the faces it has already learned. Refer to the "Forget Learned Faces" section for instructions.)
(4) Align the "+" in the center of the HuskyLens screen with the face you want to learn, and press and hold the "learn button" without releasing it. A yellow box labeled "Face: ID1" will appear on the face in the screen, indicating that HuskyLens is learning the face. Then, align the yellow box in the center of the HuskyLens screen with different angles of the same person's face, such as the front and side views (it can also be multiple photos of the same person), to enter various angles of this face. During the learning process, the RGB light will be yellow.

(5) Then, release the "learn button" to end the learning process. If HuskyLens recognizes the learned face, it will be highlighted with a blue box on the screen and display "Face: ID1."
Tip: If there is no "+" in the center of the screen, it means HuskyLens has already learned faces in this function (learned state). To make HuskyLens learn a new face, you need to make it forget the previously learned faces first.
Recognize Faces
(1) The face information learned by HuskyLens will be automatically saved. Subsequently, when HuskyLens detects a learned face, it will highlight the face with a blue box labeled "Face: ID1." The size of the box will adjust with the size of the face and automatically track it. During this time, the RGB indicator light will be green.

Forget Learned Faces
(1) If there is no "+" in the center of the screen, it means HuskyLens has already learned faces in this function (learned state). To make HuskyLens learn a new face, you need to delete the previously learned face information, which means making HuskyLens forget the learned faces.(2) The method to delete learned information is as follows: In the current function, briefly press the "learn button," and the screen will prompt "Press again to forget!" Before the countdown ends, briefly press the "learn button" again to delete the last learned information. The "+" will appear in the center of the screen, indicating that HuskyLens is ready to learn new information. If you accidentally press the "learn button" and the screen prompts "Press again to forget!" but you do not want to delete the learned information, simply do nothing until the countdown ends.

Note: The method for making HuskyLens forget learned information is exactly the same in other functions, and will not be repeated here.
2. Recognize Multiple Faces
The default setting is to learn and recognize a single face. To learn and recognize multiple faces, you need to enable the "Learn Multiple" option in the secondary menu parameters of the face recognition function.
Operation settings
Toggle the "function button" to the left until "Face Recognition" appears at the top of the screen. (2) Toggle the "function button" to the left or right to select "Learn Multiple," then briefly press the "function button." Next, toggle the "function button" to the right to turn on the "Learn Multiple" option, indicated by the progress bar turning blue and the block on the progress bar moving to the right. Briefly press the "function button" again to confirm this setting.
(3) Toggle the "function button" to the left to select "Save and Return," then briefly press the "function button." The screen will prompt "Save parameters?" With "Confirm" selected by default, briefly press the "function button" to save the parameters and automatically return to the face recognition mode.
Learning and Recognizing Multiple Faces
Learning Multiple Faces:
(1) Align the "+" in the center of the HuskyLens screen with the face you want to learn, and press and hold the "learn button" to complete the learning process for the first face (from various angles). After releasing the "learn button," the screen will prompt: "Press the button again to continue! Press another button to end." To continue learning the next face, briefly press the "learn button" before the countdown ends. If you do not need to learn additional faces, briefly press the "function button" before the countdown ends, or do nothing and wait for the countdown to end.(2) In this section, we need to continue learning the next face. Therefore, before the countdown ends, briefly press the "learn button." Then, align the "+" in the center of the HuskyLens screen with the next face to be learned, and press and hold the "learn button" to complete the learning process for the second face. Repeat this process as needed.
(3) The face IDs labeled by HuskyLens correspond to the order in which the faces were entered. That is, the learned faces will be sequentially labeled as "Face: ID1," "Face: ID2," "Face: ID3," and so on. Additionally, the border colors for different face IDs will be different.

Tip: If there is no "+" in the center of the screen, it means HuskyLens has already learned faces in this function (learned state). To make HuskyLens learn new faces, you need to first make it forget the learned faces. Refer to the "Forget Learned Faces" section for instructions.

Recognize Multiple Faces:
The face information learned by HuskyLens will be automatically saved. Subsequently, when HuskyLens detects learned faces, it will highlight these faces with a box and label them with an ID. The first learned face will be labeled "Face: ID1," the second learned face will be labeled "Face: ID2," the third learned face will be labeled "Face: ID3," and so on. The border colors for different face IDs will be different, and the size of the border will adjust according to the size of the face and automatically track it.

Experimental Phenomenon
The face recognition demo developed by the OpenELAB team uses HuskyLens for face detection and recognition. It then controls the raising and lowering of a flag through signal control by connecting the signal pin of an SG90 180-degree servo to the PWM output pin GPIO5 on a Raspberry Pi. This project is widely used in surveillance systems, access control systems, border inspections, public safety fields, and more, for identifying and tracking criminal suspects and missing persons.

If you're working on a project using a face recognition application, our website offers a wide range of face recognition products, and we can also produce customized face recognition application based on your requirements.
OpenELAB is a one-stop development platform for global AIoT electronics enthusiasts and an open-source community for electronic engineers. Besides providing developer modules online, our services also include customized manufacturing of various electronic parts such as micro switches and batteries, as well as plastic or metal parts through 3D printing, injection molding, CNC, laser cutting, etc.
In addition to face recognition products, OpenELAB offers other electronic component sourcing services such as sensors, displays, IoT, and more. OpenELAB has a user-friendly website that makes it easy to find the components you need, and we offer fast shipping to customers around the world.
Moreover, OpenELAB offers Design as a Service (DaaS) for design optimization, Manufacturing as a Service (MaaS) for production manufacturing, Supply Chain as a Service (SaaS) for supply chain support, and Quality as a Service (QaaS) for quality control to AIoT products transitioning into mass production, ensuring a smooth transition to the commercial production phase.
Most importantly, OpenELAB is dedicated to building a global open-source community for AIoT electronic developers. Through the OpenELAB open community, developers in the AIoT electronic revolution can collaborate, empower each other, and create a culture of mutual respect and collaborative sharing, generating more innovative AIoT intelligent hardware products for the world.


Leave a comment
All blog comments are checked prior to publishing