 openelab.de
 openelab.com


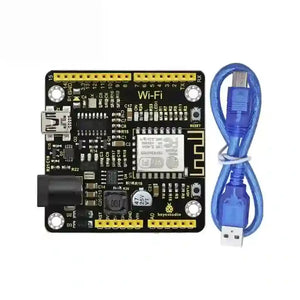

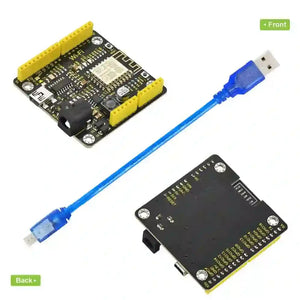

KeyeStudio ESP8266 WI-FI Development Board+USB Cable
Shipping within 72 hours
*Excluding pre-order items
The keyestudio ESP8266 Wi-Fi Development Board is built around the advanced ESP8266-12 module developed by Ai-Thinker. This powerful board is designed for integrating Wi-Fi capabilities into your projects, making it perfect for applications in the Internet of Things (IoT).

Key Features
- Powerful Microcontroller: Equipped with the Tensilica L106 ultra-low-power 32-bit microcontroller, supporting frequencies of 80MHz and 160MHz.
- RTOS Support: The board supports a Real-Time Operating System (RTOS), enhancing multitasking capabilities.
- Versatile Connectivity: Features 11 I/O ports (4 of which can be used as PWM outputs) that operate at 3.3V, including an analog input interface for various applications.
- Flexible Power Options: Can be powered via USB or an external power supply (DC 7-12V), offering flexibility in project setups.
Technical Details
- Microcontroller: ESP8266-12F
- Operating Voltage: 3V3
- Input Voltage (recommended): DC 7-12V
- Digital I/O Pins: 8 (GPIO2, GPIO4, GPIO5, GPIO12, GPIO13, GPIO14, GPIO15, GPIO16)
- Analog Input Pins: 1 (A0)
- IO output maximum current: 12 mA
- Main frequency supports 80 MHz and 160 MHz
- LED_BUILTIN: GPIO 14
- Comes with an external power jack (DC 7-12V)
- Dimensions: 54mm*56mm*15mm

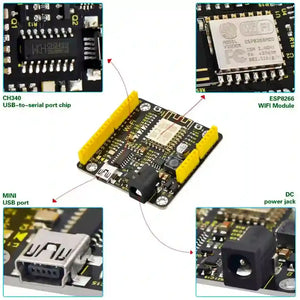
Back View:
Element and Interfaces
Here is an explanation of what every element and interface of the board does:

Specialized Functions of Some Pins
- Serial communication: ' GPIO3 (RX) and GPIO1 (TX).
- PWM Interfaces (Pulse-Width Modulation): GPIO 4, GPIO 12, GPIO 14, GPIO 15.
- SPI communication ports: GPIO6(CLK), GPIO7(MISO), GPIO8(MOSI), GPIO9(HD), GPIO10(WP), GPIO1(CS1), GPIO0(CS2)
- IIC communication: GPIO2(SDA); GPIO14(SCL)
- IR Remote Control Interface: GPIO5(IR RX); GPIO14(IR TX)
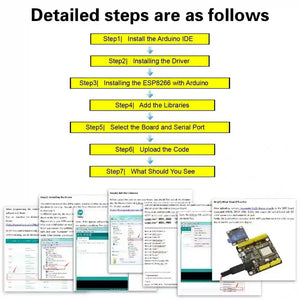
Detailed Using Methods are as follows:
Step1| Install the Arduino IDE
When programming the control board, first you should install the Arduinosoftware and driver.
You can download the different versions for different systems from the link below:
https://www.arduino.cc/en/Main/OldSoftwareReleases#1.5.x
NOTE: this control board is only compatible with Arduino 1.6.5 version or latest.
In the following, we will download the Arduino 1.6.5 version.
In this Windows system page, there are two options. One is Windows version, the other is Windows Installer.
For Windows Installer, you can download the installation file, this way you need to install the arduino IDE.
For simple Windows version, you can download the software directly, do not need to install, just directly use the software after unzip the file. Next, we click the Windows, pop up the interface as below.
Click JUST DOWNLOAD.When the ZIP file is downloaded well to your computer, you can directly unzip the file. Open the Arduino-1.6.5-r5 folder, you should get it as follows.

Click the icon of ARDUINO software to open it. This is your Arduino.
Step2| Installing the Driver
The USB to serial port chip of this control board is CH340G. So you need to install the driver for the chip. You can click the driver file here usb_ch341_3.1.2009.06 to download it.
In different systems, the driver installation is similar. Here we start to install the driver on the Win7 system.
Plug one end of your USB cable into the Keyestudio ESP8266 WI-FI board and the other into a USB socket on your computer.
When you connect the ESP8266 WI-FI board to your computer at the first time, right click your “Computer” —>for “Properties”—> click the “Device manager”, under Other devices, you should see the “USB2.0-Serial”.
Then right-click on the device and select the top menu option (Update Driver Software...) shown as the figure below.
Then it will be prompted to either “Search Automatically forupdated driversoftware” or “Browse my computer for driver software”. Shown as below. In this page, select “Browse my computer for driver software”.
After that, select the option to browseand navigate to the “drivers” folder of usb-ch341 installation.
Once the software has been installed, you will get a confirmation message. Installation completed, click “Close”.
Up to now, the driver is installed well. Then you can right click “Computer” —>“Properties”—>“Device manager”, you should see the device as the figure shown below.
Step3| Installing the ESP8266 with Arduino
Double-click the icon of Arduino software downloaded well, you will get the interface shown below.
(Note: if the Arduino software loads in the wrong language, you can change it in the preferences dialog. See the environment page for details.)
The functions of each button on the Toolbar are listed below:![]()
|
|
Check the code for errors |
|---|---|
|
|
Upload the current Sketch to the Arduino |
|
|
Create a new blank Sketch |
|
|
Show a list of Sketches |
|
|
Save the current Sketch |
|
|
Display the serial data being sent from the Arduino |
First, plug one end of your USB cable into the Keyestudio ESP8266 WI-FI board and the other into a USB socket on your computer.
Then open the Arduino IDE, click the “File” to select the “Preferences”.
The pop-up interface is shown below. See the “Additional Boards Manager URLs”, copy and paste the link: http://arduino.esp8266.com/stable/package_esp8266com_index.json and then click OK.
After that, click “Tools”, for “Board”, enter theBoards Manager, it will automatically download the relevant file. Shown below.

Done downloading the relevant file, it will pop up the window below. Then enter the 8266 on the blank bar and click Install.

Installation completed, click Close, then click “Tools”, for “Board”, you should see the Generic ESP8266 Module. Shown below.
Step4| Add the Libraries
Before upload the code to test your board, you should first add all the libraries into the libraries folder of Arduino-1.6.5-r5. You can click the link to download all the libraries needed.
https://drive.google.com/open?id=11mTs_DbCIx-PQHPjfZOAekBZ7IL8al3D
Step5| Select the Board and Serial Port
Open the Arduino IDE, you’ll need to click the “Tools”, then select the Board and the Serial Port.
You can check the Serial Port on your computer’s Device Manager.
Below is the complete settings you should refer to:

Click JUST DOWNLOAD.When the ZIP file is downloaded well to your computer, you can directly unzip the file. Open the Arduino-1.6.5-r5 folder, you should get it as follows.

Click the icon of ARDUINO software to open it. This is your Arduino.
Step2| Installing the Driver
The USB to serial port chip of this control board is CH340G. So you need to install the driver for the chip. You can click the driver file here usb_ch341_3.1.2009.06 to download it.
In different systems, the driver installation is similar. Here we start to install the driver on the Win7 system.
Plug one end of your USB cable into the Keyestudio ESP8266 WI-FI board and the other into a USB socket on your computer.
When you connect the ESP8266 WI-FI board to your computer at the first time, right click your “Computer” —>for “Properties”—> click the “Device manager”, under Other devices, you should see the “USB2.0-Serial”. Then right-click on the device and select the top menu option (Update Driver Software...) shown as the figure below.
 Then it will be prompted to either “Search Automatically forupdated driversoftware” or “Browse my computer for driver software”. Shown as below. In this page, select “Browse my computer for driver software”.
 After that, select the option to browseand navigate to the “drivers” folder of usb-ch341 installation.
 Once the software has been installed, you will get a confirmation message. Installation completed, click “Close”.
 Up to now, the driver is installed well. Then you can right click “Computer” —>“Properties”—>“Device manager”, you should see the device as the figure shown below.
Step3| Installing the ESP8266 with Arduino
Double-click the icon of Arduino software downloaded well, you will get the interface shown below.
(Note: if the Arduino software loads in the wrong language, you can change it in the preferences dialog. The functions of each button on the Toolbar are listed below:![]()
|
|
Check the code for errors |
|---|---|
|
|
Upload the current Sketch to the Arduino |
|
|
Create a new blank Sketch |
|
|
Show a list of Sketches |
|
|
Save the current Sketch |
|
|
Display the serial data being sent from the Arduino |
First, plug one end of your USB cable into the Keyestudio ESP8266 WI-FI board and the other into a USB socket on your computer.
Then open the Arduino IDE, click the “File” to select the “Preferences”. The pop-up interface is shown below. See the “Additional Boards Manager URLs”, copy and paste the link: http://arduino.esp8266.com/stable/package_esp8266com_index.json and then click OK.
 After that, click “Tools”, for “Board”, enter theBoards Manager, it will automatically download the relevant file. Shown below.

Done downloading the relevant file, it will pop up the window below. Then enter the 8266 on the blank bar and click Install.
 Installation completed, click Close, then click “Tools”, for “Board”, you should see the Generic ESP8266 Module. Shown below.
Step4| Add the Libraries
Before upload the code to test your board, you should first add all the libraries into the libraries folder of Arduino-1.6.5-r5. You can click the link to download all the libraries needed.
https://drive.google.com/open?id=11mTs_DbCIx-PQHPjfZOAekBZ7IL8al3D
Step5| Select the Board and Serial Port
Open the Arduino IDE, you’ll need to click the “Tools”, then select the Board and the Serial Port.You can check the Serial Port on your computer’s Device Manager. Below is the complete settings you should refer to:

Step6| Upload the Code
Add well all the libraries mentioned above, and select well the Board and Port, you should upload the code to test your board.
Below is an example code, you can copy and paste it on Arduino IDE. Or dowload the code here
#include "ESP8266WiFi.h"
void setup() {
  Serial.begin(115200);

  // Set WiFi to station mode and disconnect from an AP if it was previously connected
  WiFi.mode(WIFI_STA);
  WiFi.disconnect();
  delay(100);

  Serial.println("Setup done");

}

void loop() {
  Serial.println("scan start");

  // WiFi.scanNetworks will return the number of networks found
  int n = WiFi.scanNetworks();
  Serial.println("scan done");
  if (n == 0)
    Serial.println("no networks found");
  else
  {
    Serial.print(n);
    Serial.println(" networks found");
    for (int i = 0; i < n; ++i)
    {
      // Print SSID and RSSI for each network found
      Serial.print(i + 1);
      Serial.print(": ");
      Serial.print(WiFi.SSID(i));
      Serial.print(" (");
      Serial.print(WiFi.RSSI(i));
      Serial.print(")");
      Serial.println((WiFi.encryptionType(i) == ENC_TYPE_NONE)?" ":"*");
      delay(10);
    }
  }
  Serial.println("");

  // Wait a bit before scanning again
  delay(5000);
}
|
After copy and paste the code on IDE, click the compile button, if compiling successfully, the message "Done compiling." will appear in the status bar. Then click the “Upload” button, if the upload is successful, the message "Done uploading." will appear in the status bar.
Step7| What Should You See
Done uploading the code, open the serial monitor and set the baud rate to 115200, it can search the WIFI name nearby.
Applications
- IoT Solutions: Ideal for creating connected devices that communicate over the internet.
- Home Automation: Perfect for building smart home systems to automate appliances and improve energy efficiency.
- Wearable Technology: Suitable for developing wearables that require wireless connectivity.
- Education: Excellent for teaching students about microcontrollers and wireless communication in electronics.
Package List
- Keyestudio ESP8266 WI-FI Development Board * 1
- USB cable * 1

The keyestudio ESP8266 Wi-Fi Development Board is a crucial addition for hobbyists and professionals looking to enhance their projects with reliable Wi-Fi connectivity.
1. General Shipping Information
- We provide premium shipping methods with a tracking number for each order.
- Shipping addresses must be entered in English without special symbols to help the courier company recognize your address in the system. We will ship strictly according to the shipping address you provided. Please notify us of any address change before your order is marked "Shipped" to avoid parcel loss.
- Please contact our customer service staff immediately if you need to cancel or change an order. Once your order has reached "Shipped" status, it can no longer be canceled or changed in any way. To avoid complications, please recheck your shopping cart before checkout.
- We can ship all in-stock orders within 1 business day after your order has been confirmed.
- All items are inspected before dispatch and are carefully hand-packed.
- With standard courier practice, you need to check the contents of the parcel before signing for your goods. Otherwise, we will not be held responsible for any damage that may have occurred in transit.
🚀 Need Faster Shipping?
If you require expedited shipping (Express), please contact our customer support team at info@openelab.io for a customized quote tailored to your location.
2. Shipping Rates & Options
Our shipping rates are calculated based on the order value and destination. Please refer to the tables below for details.
2.1 Germany (Domestic)
| Shipping Method | Order Value | Cost | Est. Delivery |
|---|---|---|---|
| Deutsche Post | €0 - €50.00 | €4.95 | 2-4 Business Days |
| Deutsche Post | Over €50.00 | Free | 2-4 Business Days |
|
DHL Paket (Faster Delivery) |
€0 - €50.00 | €6.95 | 1-3 Business Days |
|
DHL Paket (Faster Delivery) |
€50.00 - €100.00 | €2.00 | 1-3 Business Days |
|
DHL Paket (Faster Delivery) |
Over €100.00 | Free | 1-3 Business Days |
2.2 European Union (EU)*
*Including:
| Shipping Method | Order Value | Cost | Est. Delivery |
|---|---|---|---|
| Deutsche Post | €0 - €100.00 | €7.95 | 5-9 Business Days |
| Deutsche Post | Over €100.00 | Free | 5-9 Business Days |
|
DHL Paket (Faster Delivery) |
€0 - €100.00 | €15.95 | 3-7 Business Days |
|
DHL Paket (Faster Delivery) |
€100.00 - €250.00 | €7.95 | 3-7 Business Days |
|
DHL Paket (Faster Delivery) |
Over €250.00 | Free | 3-7 Business Days |
2.3 United States
| Region | Shipping Method | Order Value | Cost | Est. Delivery |
|---|---|---|---|---|
|
Continental U.S. (50 States) |
USPS Ground Advantage | €0 - €45.00 | €5.95 | 3-7 Business Days |
| USPS Ground Advantage | Over €45.00 | Free | 3-7 Business Days | |
| USPS Priority Mail | €0 - €45.00 | €16.95 | 1-4 Business Days | |
| USPS Priority Mail | Over €45.00 | €14.95 | 1-4 Business Days | |
|
Non-Continental U.S. (AK, HI, PR, etc.) |
USPS Ground Advantage | €0 - €60.00 | €6.95 | 5-9 Business Days |
| USPS Ground Advantage | Over €60.00 | Free | 5-9 Business Days |
* The regions in the Non-Continental U.S. include: Alaska, American Samoa, Guam, Hawaii, the Marshall Islands, the Northern Mariana Islands, Palau, Puerto Rico, the U.S. Virgin Islands, and all U.S. Armed Forces addresses. The shipping and delivery to these areas are subject to the Non-Continental U.S. shipping rules.
2.4 International (Outside EU)
For specific international destinations, including Switzerland, United Kingdom, and Norway.
| Order Amount | Shipping Cost |
|---|---|
| €0 - €300.00 | €19.95 |
| Over €300.00 | Free |
Important Notice:
- Inventory Status: Please check the inventory status on the product page. Our system displays real-time stock for our Munich and Arlington warehouses. If an item is out of stock in these locations, it will be marked as "Pre-order". You can still place an order for these items.
- Pre-order Fulfillment: For "Pre-order" items, we arrange the most efficient logistics solution to ensure you receive your goods as quickly as possible. Your package may be shipped directly from our Shenzhen warehouse. Alternatively, as part of our standard restocking process, we may transport the goods to our Munich or Arlington warehouse first (typically taking 5-10 business days) before dispatching them to you.
- Split Shipments: If your order contains both in-stock and Pre-order items, we will prioritize shipping the in-stock items from the local warehouse immediately. The remaining Pre-order items will be sent to you in a separate shipment once they are ready.
3. International Warehouse
Our products are stored in our Munich, Arlington, and Shenzhen warehouses to provide more flexible logistics solutions tailored to different regions and customer needs. On each product's description page, we indicate the specific warehouse location to help you better plan your purchase and delivery schedule.
3.1 German Warehouse
For products stored in our warehouse in Munich, we use either Deutsche Post or DHL for shipping, depending on the size of the package. Logistics within Germany are very efficient, with an estimated delivery time of 2-4 business days, ensuring you receive your order quickly and conveniently. For Western EU countries, the estimated delivery time is 4-6 business days. For Eastern EU countries, the estimated delivery time is 6-8 business days.
3.2 US Warehouse
For products stored in our warehouse in Arlington, we use either USPS or UPS for shipping, depending on the size of the package. Logistics within U.S. are very efficient, with an estimated delivery time of 3-7 business days, ensuring you receive your order quickly and conveniently.
3.3 Chinese Warehouse
For Pre-order items or orders fulfilled directly from our Shenzhen warehouse, we utilize YunExpress for reliable international shipping. Given the complexities of international shipping, the estimated delivery time for these packages is around 10 business days, though this may vary slightly due to customs processes or other uncontrollable factors. Otherwise, products will be restocked to our Munich or US warehouses before final delivery, as detailed in the "Important Notice" above.
4. Customs and Taxes
4.1 How are customs handled by OpenELAB for import or export?
For EU Member States: Whether shipped from Germany or China, we cover all import duties and taxes (DDP), ensuring that you receive your package without any additional costs or hassle with customs.
For countries outside of the European Union, such as Switzerland and Norway, you may be subject to import duties, taxes, and/or customs fees charged upon delivery. These fees vary from country to country and are the sole responsibility of the recipient.
⚠️ Refusal of Delivery: If you refuse to pay these fees upon delivery and the package is returned to us, the refund amount will be calculated after deducting the original shipping costs, return shipping costs, and any applicable customs or storage fees.
4.2 How is VAT charged when the Customer places an order from OpenELAB?
In accordance with the newest VAT e-commerce rules in the EU, OpenELAB shall have the right to charge the amount of VAT at checkout. The standard rate of actual VAT applied is subject to the destination country's regulations. No additional VAT will be charged upon delivery for these orders.


