As the demand for networking solutions continues to grow, the WisdPi 5Gbps USB 3.2 Wired Base-T Ethernet Adapter, which utilizes the Realtek RTL8157 chip, has emerged as an optimal choice for users seeking to enhance their networking capabilities. This device is distinguished by its high performance and extensive compatibility. The purpose of this article is to provide an overview of the platforms supported by this Network Interface Controller (NIC), thereby elucidating its range of applications.
Driver Download
Realtek RTL8157 official link: https://www.realtek.com/Download/List?cate_id=585
System Requirements
-
Windows
-
Linux
-
MacOS 10.7 or later
-
Synology DSM / QNAP QTS*
-
Proxmox VE (PVE)*
Support Windows 11
-
Compatible Version: Windows 10、Windows 11、Windows 7
Attention: After testing, the drivers provided by Realtek for Windows 7 & 10 are not stable, and we do not recommend using them. Windows only recommends Windows 11.
Support Linux (kernel up to 5.17):
-
Compatible distributions: Ubuntu, Fedora, Debian, Arch Linux, etc.
-
Features: The kernel comes with driver support, which can be further configured by technical users through community resources to ensure broad compatibility.
Synology DSM support
Reference Article: https://github.com/bb-qq/r8152
supported platform
-
Synology DSM 7.x and 6.2
-
Architecture:
-
Alpine
-
Alpine4k
-
Apollolake
-
Armada37xx
-
Armada38x
-
Avoton
-
Braswell
-
Broadwell
-
Broadwellnk
-
Bromolow
-
Cedarview
-
Denverton
-
Epyc7002
-
Geminilake
-
Monaco
-
R1000
-
RTD1296
-
V1000
-
How to install it?
Preparation
-
Download drive package form https://github.com/bb-qq/r8152/releases
-
Enable SSH and login to your NAS.
Installation
-
Go to "Package Center"
-
Press "Manual Install"
-
Choose a driver package downloaded
-
[DSM7] The installation will fail the first time. After that, run the following command from the SSH terminal:
// Some code
sudo install -m 4755 -o root -D /var/packages/r8152/target/r8152/spk_su /opt/sbin/spk_su
-
[DSM7] Retry installation. You don't need the above DSM7-specific steps next time.
-
Reboot your NAS. This procedure is not usually necessary, but many have reported that a reboot was necessary, so please reboot just in case.
-
Open the driver package from the Package Center and start the driver manually.
Warning: Do not use Safari for this operation.
How to configure
You can configure the IP addresses and MTU of the added NICs from the DSM UI in the same way as the built-in NICs.
Option: Recommend setting MTU to 9000 and SMB protocol version to v3 for better performance.
Ubuntu support
Note:
-
The driver is a clone of Realtek linux driver r8152-2.18.1.
-
We have tested the driver on Ubuntu 24.04.1.
-
In theory, it supports all Linux distribution versions after kernel version 4.10. If it works correctly on other versions during testing, please let me know, and we will add them to the compatibility list.
Compatibility(Tested)
-
Ubuntu 24.04
Requirements
-
Ubuntu 24.04.01
-
Kernel: WP-UT5
Quick install
-
Prepare
sudo apt update -y && sudo apt install git gcc make -y
-
Clone the code
git clone https://github.com/wisdpi/wp-ut5_linux.git
-
Change to the directory
cd wp-ut5_linux/
-
Build
sudo depmod -a
sudo make all
-
Config system
sudo update-initramfs -u
sudo cp 50-wput5.rules /etc/udev/rules.d/
-
Reboot:
sudo reboot
-
You can check whether the driver is loaded by using following commands.
lsmod | grep r8152
ifconfig -a2
Proxmox VE (PVE) support
With reference to the example of PVE 8.0.3, the operating procedures should be similar for other versions such as PVE 6.x, 7.x, and 8.x. If you encounter any issues during use, please contact us, and we will conduct relevant tests.
Proxmox Virtual Environment (PVE) is based on Debian, and the tutorial for it is very similar to the previous one for Ubuntu.
Supported platform
| Release | Status | Result |
| 7.x | Not tested | |
| 8 | Tested | Supported |
| 8.2 | Not tested |
How to install it?
Add APT repositories no-subscription (Web-UI or shell)
Web-UI:
Click the PVE node -> Updates -> Repositories -> No-Subscription -> Add

You will get this result

shell:
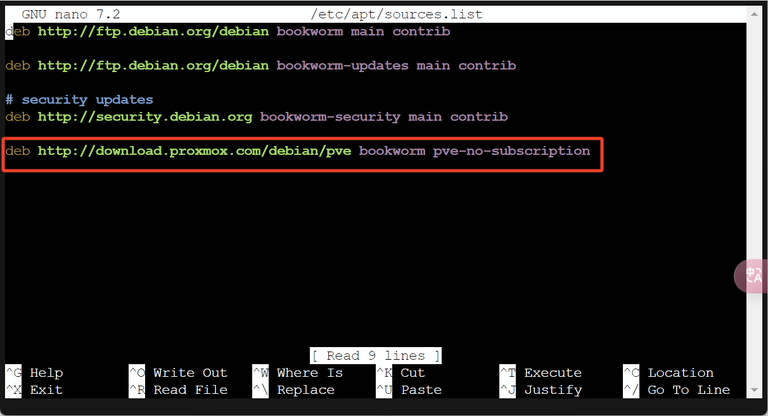
edit sources.list
// edit sources.list
nano /etc/apt/sources.list
Add this repositories
deb http://download.proxmox.com/debian/pve bookworm pve-no-subscription
Clone the driver files
// download the driver
git clone https://github.com/wisdpi/wp-ut5_linux.git
Check the kernel version
// Check kernel version
pveversion -v | grep proxmox-ve

// install the kernel headers file
apt install pve-headers-6.2.16-3-pve
Build and install the driver
depmod -a && make all

update-initramfs -u
cp 50-wput5.rules /etc/udev/rules.d/
// reboot pve system
reboot
// check the driver
lsmod | grep 8152

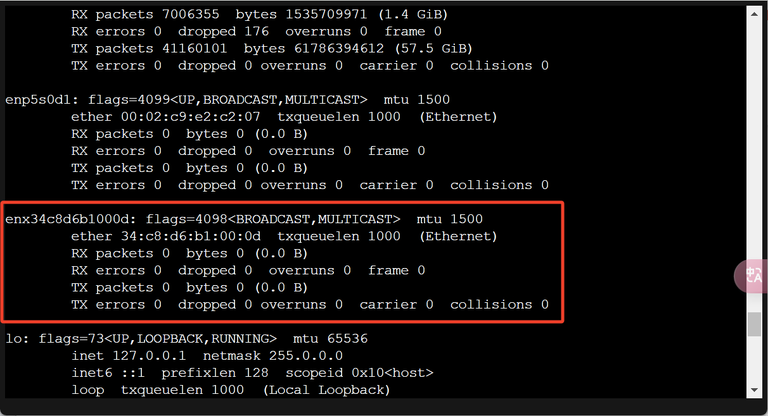
Check the ethernet name
// check the wp-ut5 name
ifconfig -a
 openelab.de
 openelab.com


