


Introduction to M5StickC PLUS
The M5StickC PLUS is an upgraded version of the popular M5StickC, designed to make IoT development faster, easier, and more accessible. Powered by the ESP32-PICO-D4 chip with built-in Wi-Fi, this mini development kit combines a compact form factor with powerful hardware, making it ideal for prototyping IoT projects, wearable devices, and smart home solutions.
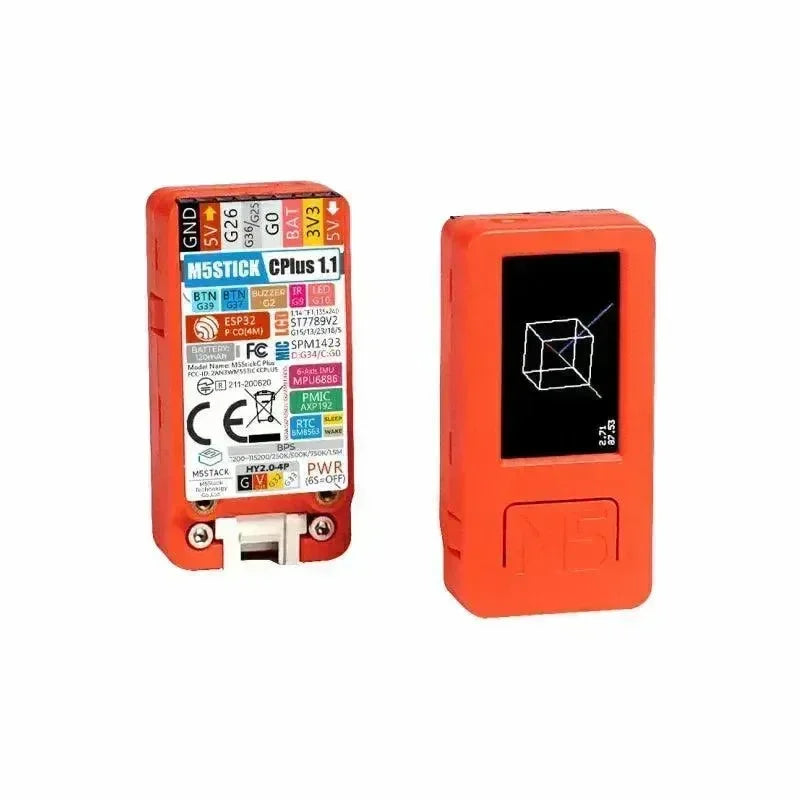
With its 1.14-inch LCD screen, integrated sensors, and expandable design, the M5StickC PLUS is a versatile tool for developers, hobbyists, and educators. Whether you're building a weather station, a remote controller, or a fitness tracker, this device provides everything you need to bring your ideas to life.
Key Features of M5StickC PLUS
- Dual-core processor with Wi-Fi and Bluetooth connectivity.
- Low power consumption for battery-powered projects.
- 1.14-inch LCD Display:
- Larger screen (135 x 240 resolution) compared to the original M5StickC.
- 18.7% more display area for better visualization.
- Integrated Sensors & Peripherals:
- IMU (Inertial Measurement Unit): Accelerometer and gyroscope for motion tracking.
- Microphone: Voice recognition and audio input capabilities.
- Infrared Transmitter: Remote control functionality.
- RTC (Real-Time Clock): Accurate timekeeping for time-sensitive applications.
- Buzzer: Audio feedback for notifications or alarms.
- Enhanced Battery Capacity:
- 120mAh battery (up from 95mAh in the original M5StickC).
- Supports USB-C charging for convenience.
- Expandable Design:
- Compatible with M5Stack HATs and Unit modules for added functionality (e.g., environmental sensors, relays, or GPS).
- Enables seamless integration with other M5Stack ecosystem products.
- User-Friendly Development:
- Open-source platform with support for Arduino, MicroPython, and UIFlow (block-based programming).
- Streamlined development process for rapid prototyping.
How to Use M5StickC PLUS (Step-by-Step Tutorial)
Step 1: Unboxing & Initial Setup
- What’s in the Box:
- Charging the Device:
- Connect the USB-C cable to the device and a power source.
- The LED indicator will turn red while charging and green when fully charged.
- Powering On:
- Press the side button to turn on the device.
Step 2: Installing Development Tools
- Arduino IDE Setup:
- Download and install the Arduino IDE from arduino.cc.
- Add the ESP32 board support:
- Go to File > Preferences and paste this URL in Additional Boards Manager URLs:
https://dl.espressif.com/dl/package_esp32_index.json
- Install the ESP32 package via Tools > Board > Boards Manager.
- Install the M5Stack library:
- Go to Tools > Manage Libraries and search for M5StickCPlus.
- UIFlow Setup:
- Download UIFlow.
- Connect the device via USB-C and follow the on-screen instructions to flash the firmware.
Step 3: Writing Your First Program
- Open Arduino IDE and select M5Stick-C PLUS under Tools > Board.
- Copy and paste the following code:
#include

void setup() {
  M5.begin();
  M5.Lcd.setRotation(1);
  M5.Lcd.fillScreen(BLACK);
  M5.Lcd.setTextColor(WHITE);
  M5.Lcd.setTextSize(2);
  M5.Lcd.setCursor(10, 40);
  M5.Lcd.print("Hello, M5StickC PLUS!");
}

void loop() {
  // Keep the message displayed
}
- Click Upload and wait for the program to be transferred to the device. The text "Hello, M5StickC PLUS!" should appear on the screen.
Step 4: Using Built-in Components
-
Button Input: Detect button presses using the built-in buttons
BtnAandBtnBwith the following code:
if (M5.BtnA.wasPressed()) {
    M5.Lcd.print("Button A Pressed");
}
if (M5.BtnB.wasPressed()) {
    M5.Lcd.print("Button B Pressed");
}
- Buzzer: Play a simple sound with:
M5.Speaker.tone(1000, 200); // 1000Hz tone for 200 milliseconds
Step 5: Expanding Functionality
- Adding HATs or Units:
- Attach an ENV III Unit for temperature, humidity, and pressure sensing.
- Use a GPS Unit for location tracking.
- Example Project: Weather Station
- Connect the ENV III Unit to the M5StickC PLUS.
- Use the following Arduino code to display sensor data:
#include
#include

SHT3X sht30;
QMP6988 qmp6988;

void setup() {
  M5.begin();
  Wire.begin();
  qmp6988.init();
  M5.Lcd.setTextSize(2);
}

void loop() {
  float temp = sht30.cTemp;
  float humi = sht30.humidity;
  float pressure = qmp6988.calcPressure() / 100.0;

  M5.Lcd.setCursor(0, 0);
  M5.Lcd.printf("Temp: %.1fC\nHumi: %.1f%%\nPres: %.1fhPa", temp, humi, pressure);
  delay(1000);
}
FAQs About M5StickC PLUS
Q: What is the difference between M5StickC and M5StickC PLUS?
Q: Can I use M5StickC PLUS for commercial projects?
Q: What programming languages are supported?
Applications of M5StickC PLUS
-
IoT Prototyping:
-
Build smart home devices like remote controls, environmental monitors, or security systems.
-
Wearable Technology:
-
Create fitness trackers, smartwatches, or health monitoring devices.
-
Industrial Automation:
-
Develop remote monitoring systems for machinery or environmental conditions.
-
Education & Learning:
-
Teach programming and IoT concepts with an easy-to-use, all-in-one kit.
-
DIY Projects:
-
Design custom gadgets like game controllers, voice assistants, or portable data loggers.
Why Choose M5StickC PLUS?
- Compact & Portable: Fits in the palm of your hand, perfect for on-the-go development.
- All-in-One Design: Integrated sensors, display, and connectivity reduce the need for external components.
- Expandable Ecosystem: Compatible with M5Stack’s extensive range of add-ons and accessories.
- Beginner-Friendly: Intuitive programming tools like UIFlow make it accessible to all skill levels.
Conclusion: Unlock Your IoT Potential with M5StickC PLUS
The M5StickC PLUS is a powerful, compact, and user-friendly IoT development kit that simplifies prototyping and accelerates innovation. With its enhanced display, integrated sensors, and expandable design, it’s the perfect tool for developers, educators, and hobbyists alike.
Ready to Start?