 openelab.de
 openelab.com


What is 6-Channel Wi-Fi Relay Module?
Key Features
-
Smart Home Integration: Effortlessly integrates with Home Assistant using pre-installed ESPHome firmware, allowing you to control and automate your devices remotely over Wi-Fi without any complex setup.
-
Six Independent Relays: Equipped with 6 independent relay channels, this module lets you manage multiple DC devices at the same time. From lights to motors, it’s a perfect all-in-one solution for smart home automation.
-
Powered by XIAO ESP32-C6: Driven by the Seeed Studio XIAO ESP32-C6, it provides reliable Wi-Fi, BLE 5.0, Zigbee, and Thread connectivity, ensuring strong performance for all your automation needs.
-
Expandable Design: Includes two Grove interface ports for quick and easy connection to additional Grove sensors or actuators. Expand your setup effortlessly without complex wiring or modifications.
-
Compact and Developer-Friendly: The compact design saves space while delivering professional-grade reliability. Fully compatible with Arduino IDE, making it an excellent choice for both beginners and advanced developers.
Specifications
| Processor | XIAO ESP32-C6 |
| Input voltage (Type-C) | DC 5V (For XIAO) |
| Interfaces | 2.4GHz Wi-Fi 6, 1xIIC(Grove), 1xUART(Grove), USB(Type-C) |
| Outputs | 6 Relay Channels, each with COM,NC,NO10A 30VDC (recommended)10A 250VAC |
| Dimensions | 97mm*92mm*31mm |
| Enclosure | 3D Printed Colcor: BlackMaterial: PLA |
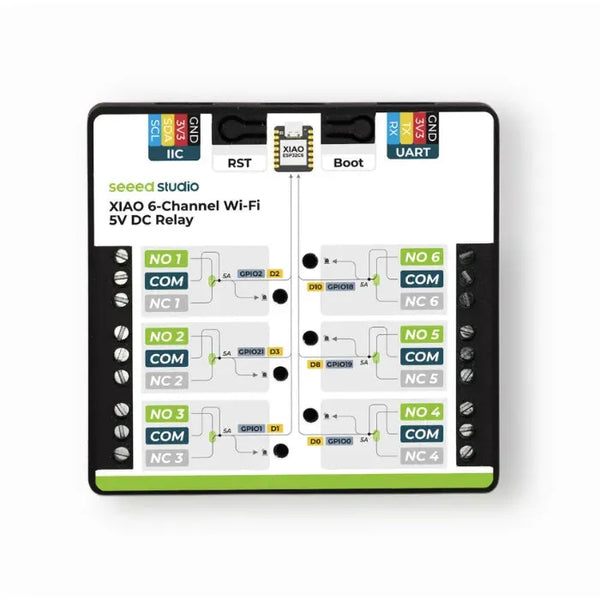
Physical Layout and Connections

| XIAO GPIO | Relay Channel |
| GPIO2 | Relay 1 |
| GPIO21 | Relay 2 |
| GPIO1 | Relay 3 |
| GPIO0 | Relay 4 |
| GPIO19 | Relay 5 |
| GPIO18 | Relay 6 |
-
NO (Normally Open): The normally open terminal. By default, this terminal is not connected to the common terminal (COM). When the relay is activated, the NO terminal connects to the COM terminal. It is typically used to control a load's switch.
-
COM (Common): The common terminal of the relay, shared as a connection point to one side of the circuit.
-
NC (Normally Closed): The normally closed terminal. By default, this terminal is connected to the common terminal (COM). When the relay is activated, the connection between the NC terminal and the COM terminal is broken. It is typically used for scenarios requiring disconnection control.
How to use 6-Channel Wi-Fi Relay Device?
Preparation before you start
-
Core Components: 6-Channel Wi-Fi Relay Module and Home Assistant Green
-
Network: Stable Wi-Fi for seamless interaction between hardware and Home Assistant.
Step 1 Setting Up Home Assistant
-
Installation: homeassistant is already pre-installed in Home Assistant Green.
-
Enabling ESPHome Add-on:1. Access the Home Assistant dashboard.2. Navigate to the "Add-ons" section and search for the ESPHome add-on.3. Click "Install" and then "Start" to enable it.4. Once installed, configure the add-on to ensure proper communication with the XIAO ESP32C6.

Step2 Preparing the Relay Module
-
Re-flashing the Firmware: If the current firmware becomes corrupted or needs a reset to factory settings.
-
Upgrading the Firmware: To install a newer version that offers enhanced features or functionality.
-
Use the Web Tool for a quick and straightforward way to flash your firmware. Just follow the on-screen instructions:
1. Click CONNECT to start the connection process
2. The tool will automatically handle the firmware update for you.
-
To use this method, follow these steps:1. Download the Firmware: Get the .bin firmware file from the provided link and unzip it.2. Connect the Device: Plug the sensor kit into your PC.3. Access ESPHome Web: Navigate to the ESPHome Web page.4. Select the Firmware: Choose the file with the *.factory.bin suffix.5. Follow the Guide: Watch the accompanying video for a step-by-step tutorial on flashing the firmware using ESPHome Web:
Step3 Network Configuration
-
Enable Access Point: Upon powering up for the first time, the module will create a Wi-Fi network (SSID: seeedstudio-6-channel-relay).

-
Access Configuration:
Connect to the network using a phone or PC.
Open a browser and navigate to http://192.168.4.1.
Enter the SSID and password of your home Wi-Fi network.

-
Home Assistant Integration:
Once connected to the home network, the module will be discoverable in Home Assistant under Settings -> Devices & Services.

This way, you can connect the module to your Home Assistant network and let Home Assistant discover it.
Step4 Add the module device
-
Automatic Discovery:
1. Ensure the ESPHome is installed in Home Assistant.
2. Navigate to Settings ->Devices & Services -> Integrations and look for the device
-
Manual Configuration: If not automatically discovered, manually add the device by specifying its IP address.
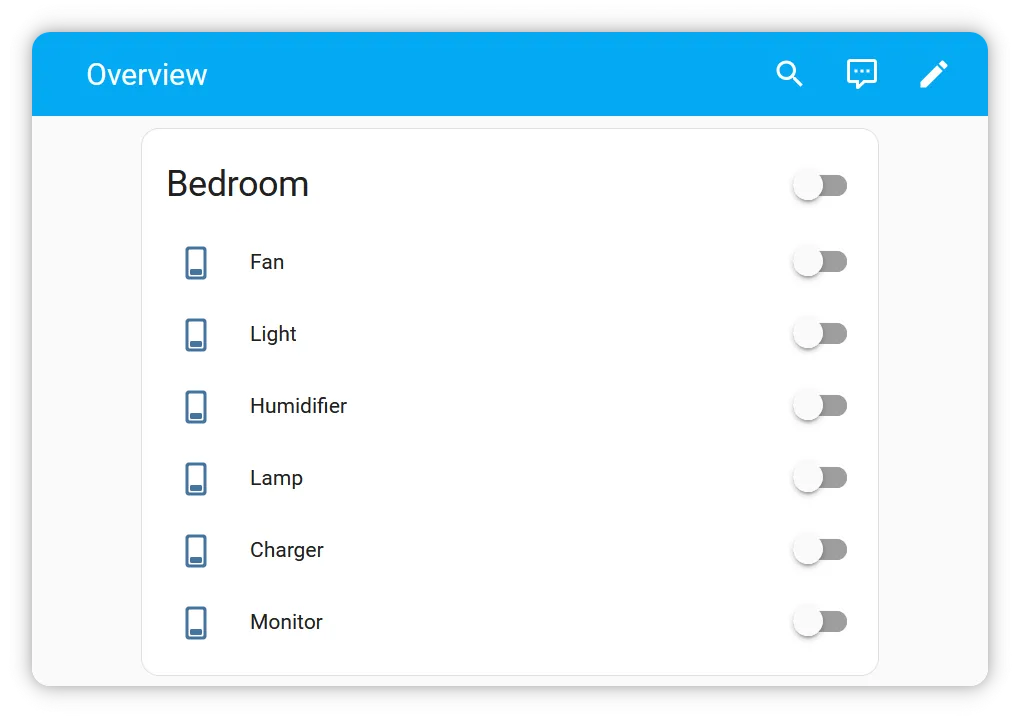
After adding the device, you can see all six switches in the Overview page.

You can also set the name of each switch individually.
Step5 Connect the appliances you want to control
-
Wiring:
1. Follow the Physical Layout and Connections section to wire the relay module.
2. Ensure all connections are secure, and there are no exposed wires.
-
Power On:
1. Power on the module through USB.
2. Turn on the DC power supply to control other electrical appliances.
Safety Warning:
This relay module is designed for low-voltage DC operation. Do not connect it to AC power to avoid electrical hazards. Always disconnect the power supply before wiring the relay to prevent short circuits and electric shock.
FAQ
Why should I choose Seeed Studio XIAO 6-Channel Wi-Fi 5V DC Relay?
Seeed Studio XIAO 6-Channel Wi-Fi 5V DC Relay is perfect for automating DC devices like lights and motors in smart home setups. Powered by XIAO ESP32-C6, it supports Wi-Fi, BLE, Zigbee, and Thread, ensuring seamless integration with platforms like Home Assistant. Its compact design, pre-installed firmware, and Grove expansion ports make it user-friendly and versatile, while Arduino IDE support allows for customization. If you need a reliable, space-saving, and feature-rich relay for IoT projects, this module is an excellent choice.
How do I know if my relay is working?
Here are some suggestions to check if your Seeed Studio XIAO 6-Channel Wi-Fi 5V DC Relay is functioning properly:
-
Power On: Ensure the module is connected to a 5V DC power supply and check for indicator lights.
-
Wi-Fi Connection: Confirm it connects to your network or appears in Home Assistant if pre-flashed with ESPHome.
-
Relay Test: Attach a DC load (e.g., LED or motor) to a relay output and toggle it via the control interface.
-
Relay LEDs: Verify that the indicator LEDs light up when relays are activated.
If it doesn’t work, check power, wiring, and firmware.
Can I use the USB port while connected to AC power?
No, using USB while connected to AC power may damage the device or create a safety hazard.
Can this module work without Home Assistant?
Yes, the module can be controlled via its local IP address or integrated with other platforms that support ESPHome or MQTT.
Is it compatible with other smart home platforms besides Home Assistant?
Yes, this relay can work with other platforms like OpenHAB or Node-RED, but it is primarily designed to integrate seamlessly with Home Assistant. It can also work with platforms that support ESPHome, as it comes pre-flashed with ESPHome firmware.
Can the Grove ports support specific types of sensors or actuators?
Yes, the Grove ports support a wide range of sensors and actuators. You can connect various sensors for temperature, humidity, motion, or light levels, as well as actuators like motors or solenoids, to further extend your automation project.


