 openelab.de
 openelab.com


Het draaien van Home Assistant op een Raspberry Pi is een van de meest kosteneffectieve en flexibele manieren om je smart home-hub te bouwen. Of je nu kiest voor de goed gevestigde Raspberry Pi 4 of de snellere, meer toekomstbestendige Raspberry Pi 5, beide bieden een compact, energiezuinig platform dat moeiteloos lichten, sensoren, camera's en automatiseringen kan beheren. Deze gids begeleidt je door alles, van hardwarekeuze tot de eerste opstart, zodat je je systeem binnen enkele minuten operationeel hebt.
Haal je Raspberry Pi

1. Waarom Raspberry Pi 4 & 5 geweldig zijn voor Home Assistant
Raspberry Pi 4 en 5 zijn populaire keuzes voor het draaien van Home Assistant vanwege hun compacte formaat, laag energieverbruik en solide prestaties voor kleine tot middelgrote smart home-installaties.
-
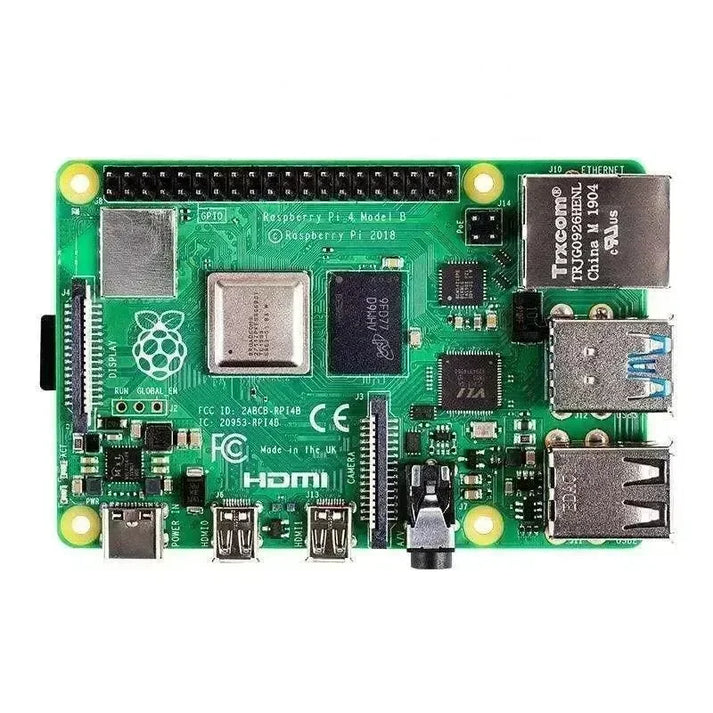
Raspberry Pi 4: Quad‑core Cortex‑A72, tot 8GB RAM.
-
Raspberry Pi 5: Quad‑core Cortex‑A76 (2.4 GHz), snellere I/O met PCIe, tot 8GB RAM. Als je op zoek bent naar betere prestaties en toekomstbestendigheid, biedt Pi 5 merkbare snelheidsverbeteringen bij databasebewerkingen en add-on reactievermogen.
2. Vereiste hardware
Om te beginnen, bereid het volgende voor:
-
Raspberry Pi 4 of 5 (minimaal 2GB RAM, 4GB+ aanbevolen)
-
MicroSD-kaart – Applicatieklasse 2 (A2) of beter, minimaal 32GB
-
Officiële voeding – Pi 4: 5V/3A USB‑C, Pi 5: 27W USB‑C PD
-
SD-kaartlezer (ingebouwd of USB)
-
Ethernetkabel – Vereist voor installatie; kan later worden overgeschakeld naar Wi‑Fi, maar bekabeld is betrouwbaarder
-
(Optioneel) HDMI-kabel + monitor voor probleemoplossing
💡 Tip: Vermijd opladers van mobiele telefoons of USB-poorten van pc's — deze kunnen mogelijk geen stabiele stroom leveren.
3. Het schrijven van het Home Assistant OS Image
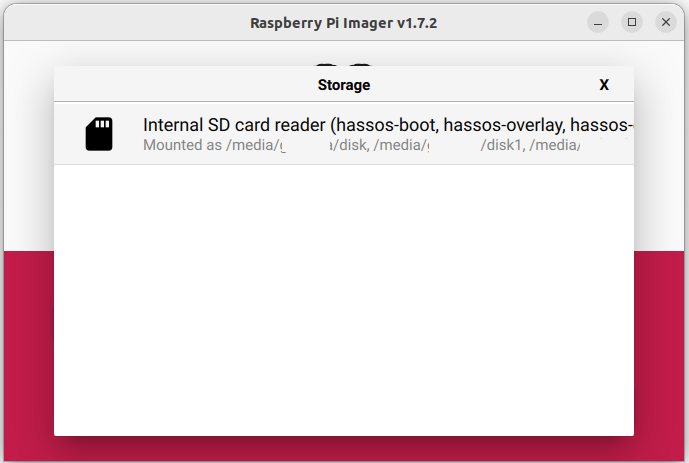
De gemakkelijkste manier is om Raspberry Pi Imager te gebruiken:
-
Download Raspberry Pi Imager en installeer het.
-
Kies uw apparaat: Raspberry Pi 4 of 5.
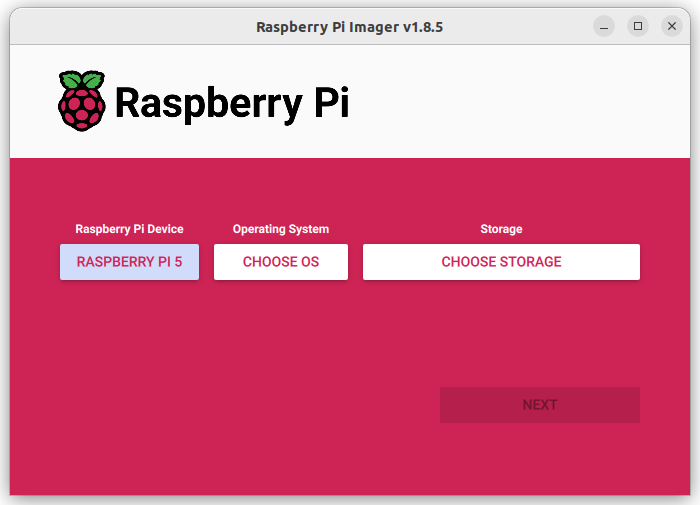
3. Selecteer het OS: Other specific‑purpose OS → Home assistants and home automation → Home Assistant. Zorg ervoor dat u de juiste versie kiest voor uw Pi-model.
4. Plaats uw MicroSD-kaart en selecteer deze als opslag.
5. Klik op Schrijven en wacht tot het proces is voltooid.

6. Verwijder de SD-kaart veilig.
Als Pi Imager niet beschikbaar is voor uw systeem, download dan handmatig de Pi 5 image of Pi 4 image en flash deze met Balena Etcher.
4. Eerste opstart & toegang tot Home Assistant
-
Plaats de MicroSD-kaart in je Raspberry Pi.
-
Verbind de Pi met je router via Ethernet.
-
Sluit de voeding aan.
-
Wacht ongeveer 1 minuut (op Pi 4/5) totdat het systeem is geïnitialiseerd.
-
Open op je computer een browser en ga naar:
-
http://homeassistant.local:8123 -
Goud
http://homeassistant:8123/http://<Pi_IP_Address>:8123als de eerste optie niet werkt.
-
-
Voltooi de onboarding in je browser.
5. Problemen oplossen bij installatie
-
Geen webinterface na 5 minuten: Flits de SD-kaart opnieuw of probeer een andere kaart.
-
Opstartproblemen: Sluit een monitor aan via HDMI om logs te bekijken.
-
Willekeurige herstarts: Controleer of je een geschikte voeding gebruikt.
6. Volgende stappen na installatie
-
Maak je eerste back-up.
-
Voeg integraties toe voor je apparaten.
-
Overweeg het toevoegen van Zigbee, Z-Wave of Thread via USB-dongles.
-
Voor Pi 5: Overweeg een upgrade naar SSD-opslag via PCIe voor snellere prestaties.
7. Samenvatting
Met de juiste hardware en een betrouwbaar installatieproces kunnen zowel Raspberry Pi 4 als 5 uitstekende platforms zijn voor Home Assistant. Hoewel Pi 4 nog steeds geschikt is voor de meeste toepassingen, maken de snelheid en uitbreidbaarheid van Pi 5 het een sterkere investering op lange termijn voor grotere smart home-ecosystemen.


